[How to] Replace your old CD/DVD drive in your PC
Have you ever suffered from having an old computer, or a faulty CD/DVD drive? If yes, then even a doctor would would know enough to tell you that you need to replace it. And fast.
That’s when I decided to replaced my old CD-ROM (can you believe it?) with a brand new DVD-RAM. B)
Its not a difficult thing to do, all you need to do is have a small star screwdriver. This is actually the easiest DIY ever. So, starters are at relief. While that adds, this is also a DIY with no pictures. 🙁 You see I forgot to take pictures when I did that but still its dumbing ease will make it comforting for you. 🙂
Getting the DVD Drive:
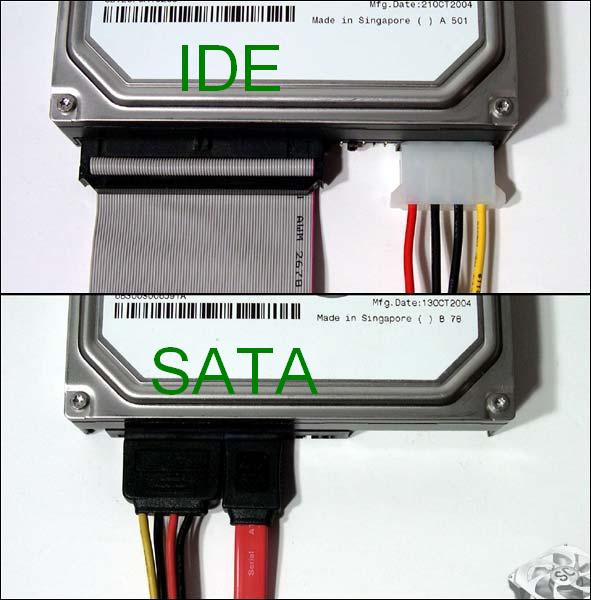
You’ll need to get a compatible DVD drive for your computer. Basically, there are 2 standards, IDE and SATA. Open up your computer (More on point no. 1) and check what kind of a cable your computer is using.
Normally, computers having SATA ports will also have IDE ports. Go for SATA DVD drives (Cheaper and Better)
1) Firstly, you need to rip-off your PC cabinet to expose its interiors. Its not difficult, you just need to remove the outer screws and SLIDE out the side panels (both of them).
2) Once you’ve done that, you will easily see the CD/DVD drive from the inside. Unscrew the screws on the sides. Slide it out. Unplug the wires.
3) Slide out the old CD/DVD drive, after removing a couple of screws that hold it in its place.
4) Now just put in your new drive, reconnect the wires at the same places, and you’re good to go!! 🙂
Troubleshooting:
Some old computers (using IDE cables) can’t distinguish between Master and Slave drives if the jumpers are not set properly. If you connect two devices with the same cable, only one of the two device will be detected.
To solve it, you’ll have to set one as Master and one as slave. Here’s how:
If you have any doubts, please comment. 🙂
